
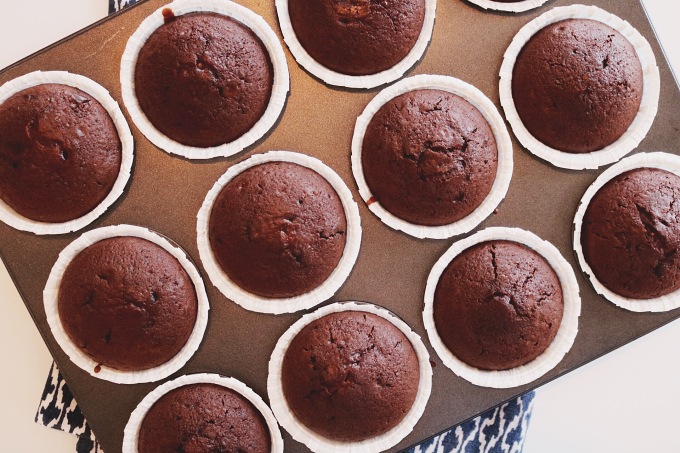


Yeyy, finally I did beautiful and super delicious cupcakes! I’m not that good at baking, I’m still practicing and I do get better and better. I usually think that making cupcakes seems so hard or a lot of work. But now I just think it’s super fun, specially to pipe. I can bet you that you will see more cupcake recipes coming up here haha.
This time I made chocolate cupcakes with chocolate bites inside and a super good frosting with blackberry. You need to try these! The chocolate cake is so soft and the frosting is so fluffy and creamy, you will love them.
YOU NEED:
12 cupcakes.
Chocolate cupcake:
4 dl of flour
2 dl sugar
4 tsp baking powder
2 tsp vanilla sugar
A pinch of salt
1 dl cocoa powder
1 egg
3 dl milk
1 dl neutral oil
100 gram dark chocolate, chopped
Blackberry frosting:
3 dl blackberries
2 tbsp lemon juice
225 gram butter, room temp (needs to be very soft)
1/2 tsp salt
9 dl powdered sugar, sifted (more if needed)
Blackberries for garnish
DO THIS:
- Chocolate cupcakes: Set the oven on 175 C. Line a muffin pan with baking cases. Mix flour, sugar, baking powder, vanilla sugar, salt and cocoa in a bowl. Mix so that everything is mixed properly.
- Beat egg, milk and oil for about 1 minute. Mix in the flour mixture together with the egg mixture, stirring until smooth.
- Stir in the chopped chocolate to the batter. Divide the batter evenly into the baking cases and bake in the middle of the oven for about 15-20 minutes.
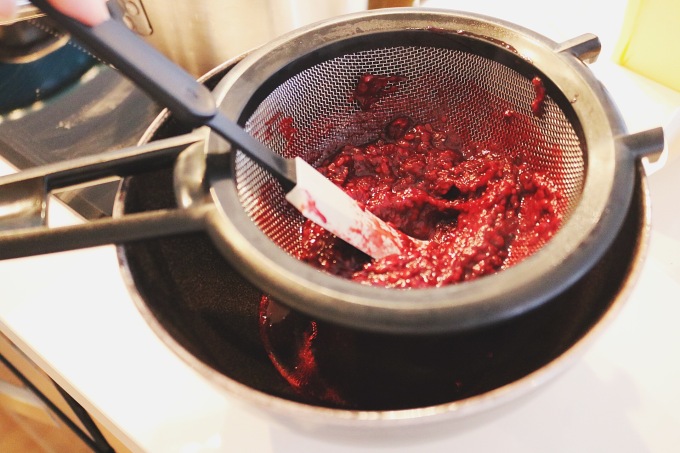
- Blackberry frosting: Put the blackberries and lemon juice in a small saucepan. Bring to a simmer over medium heat, and stir constantly until blackberries have become soft enough to mash. Cook for about 7 minutes. It will look like blackberry jam.
- Remove the mixture from the heat. Place a strainer over a small bowl and push the puree though, leaving seeds and large chunks behind. Allow mixture to cool completely before using.
- Beat the butter in a bowl on medium-speed until completely smooth, scraping down the sides when needed, about 4 minutes. Should be fluffy and very light colour. Add in the blackberry sauce and beat until completely combined.
- Add in the powdered sugar, 2 dl at a time, on low speed. Once all of the sugar has been added, add in salt and beat for another 2 minutes.
- Spoon the frosting into a piping bag. Pipe the frosting onto each cupcake. Top with blackberry!
ENJOY!!! :)
x Jen
INSTAGRAM:
@JENNIFERBERGP & @JENSDELISIOUSLIFE
For all my recipes, visit https://jensdeliciouslife.com/


My mom is visiting me here in Iceland and of course we cook a lot of thai food, or my mom does haha. I’m still learning to cook as good thai food as mom.
We made this delicious green curry dish with chicken that is so easy to cook. Your home will smell like a real thai restaurant after cooking this.
Remember not to chop the veggies, it should be in bigger pieces.
YOU NEED:
4 port.
300 gram Chicken filé, or I prefer chicken thigh filé, sliced into pieces
1 can full fat coconut milk
5 big tbsp green curry paste
1 can sliced bamboo, drained
2 dl water
4 tbsp fish sauce
1 1/2 tsp sugar
1/2 onion, cut into pieces
1 small zucchini, cut into pieces
8-10 mushrooms, cut half or 1/4
1 red paprika, cut into pieces
For garnish:
1 red chilli, remove the seeds and slice thinly
Chopped coriander
DO THIS:
- Add coconut milk, only the white part and the green curry paste in a wok pan or a big pot on medium heat. Stir constantly. Cook until fragrant and bubbly, should start to be a bit oily.
- Add in chicken and simmer for about 10 minutes, or until the chicken is done. Add the bamboo.
- Stir in the rest of the coconut milk/water from the can and 2 dl water, then add the fish sauce and sugar. Stir and let simmer for another few minutes.
- Add the onion and veggies and stir everything together and cook for about 10 minutes, or until veggies are tender-crisp.
- Taste and see if you need more fish sauce (fish sauce is like salt).
- Serve in a bowl and garnish with red chilli and coriander. Serve it with cooked jasmine rice.
ENJOY! :)
x Jen
INSTAGRAM:
@JENNIFERBERGP & @JENSDELISIOUSLIFE
For all my recipes, visit https://jensdeliciouslife.com/


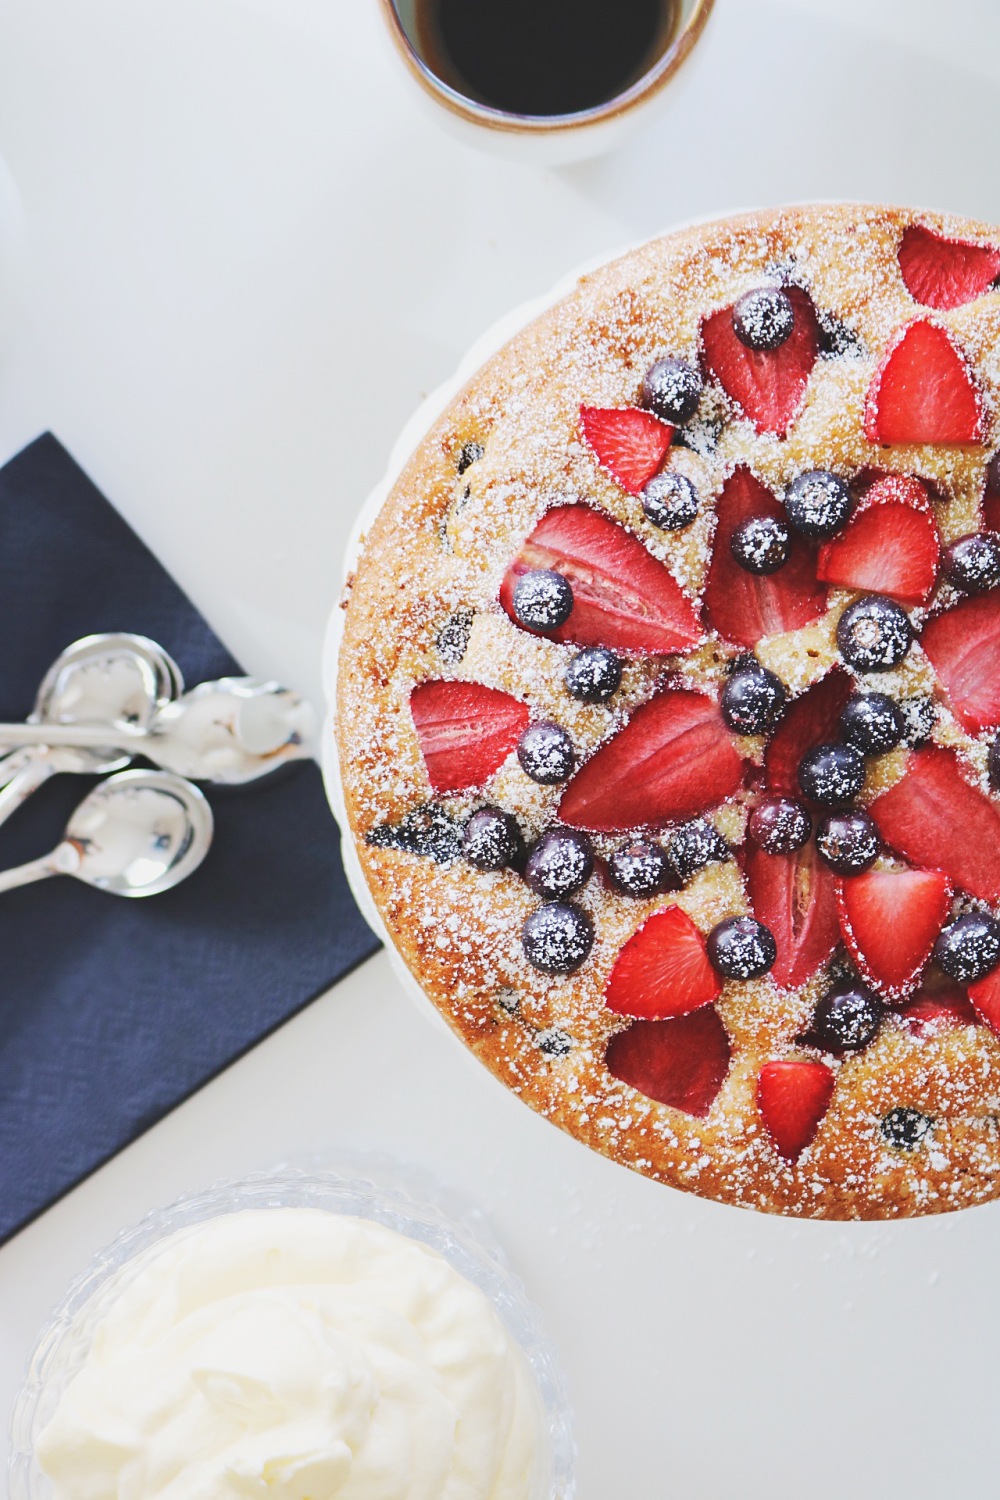


This cake is so moist, tasty and beautiful. A perfect summer cake with strawberries and blueberries to treat your guest with. You can also choose other berries or fruits if you like. But this time I chose these berries as the summer is just around the corner.
Serve the cake with some light whipped cream, yummy!
YOU NEED:
8 port.
3 1/2 dl flour
1 tsp baking powder
1/2 tsp baking soda
1 1/2 tsp vanilla sugar
50 gram butter, room temp
2 1/2 dl sugar
2 eggs
1 1/2 dl greek yogurt
Fresh strawberries and blueberries
1 tbsp granulated sugar
DO THIS:
- Preheat the oven to 170 degrees. Grease a round springform (22 cm) the side and the bottom with butter. Line the bottom with parchment paper. Grease the parchment paper too.
- Sift flour, baking powder, baking soda and vanilla sugar together into a bowl.
- In a separate bowl, beat butter, sugar and eggs until light in color and fluffy. Add greek yogurt and continue beating until creamy.
- Mix in the flour mix slow until combined. Don’t over mix.
- Transfer the batter to the springform pan. Top it with sliced strawberries and blueberries evenly on top. Sprinkle with granulated sugar.
- Bake until the cake turns golden, and the tester comes out clean in the center, takes about 1 hour, depending on your oven. During halfway through baking, put some extra berries on top of the cake and return to baking.
- Let the cake cool before you release it from the springform.
- Sprinkle the cake with powdered sugar and serve it with some light whipped cream.
ENJOY! :)
x Jen
INSTAGRAM:
@JENNIFERBERGP & @JENSDELISIOUSLIFE
For all my recipes, visit https://jensdeliciouslife.com/


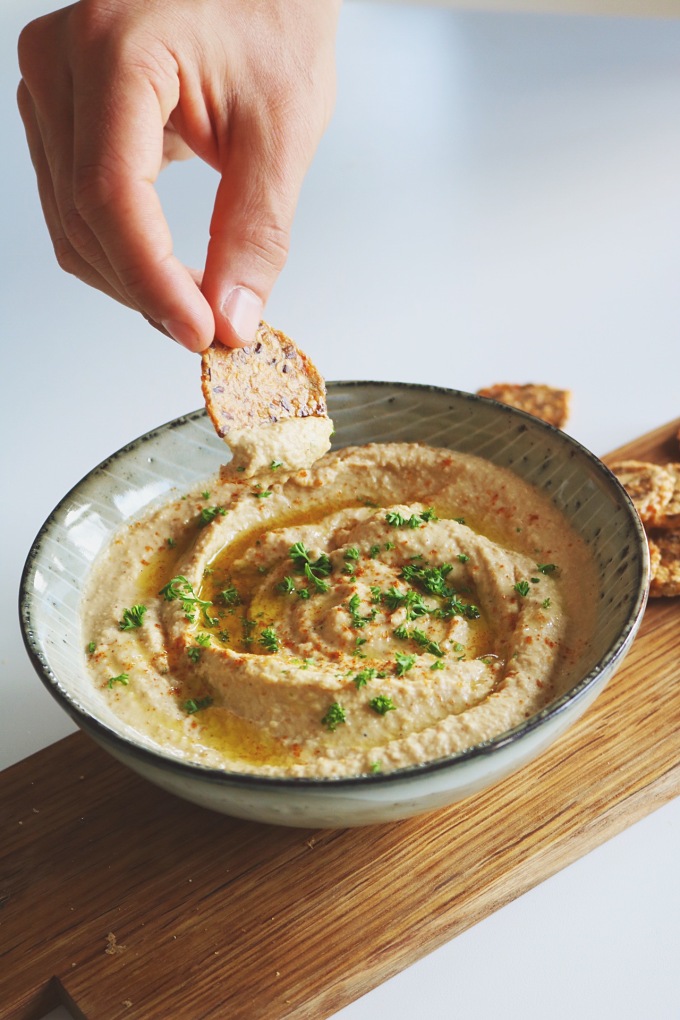
I seriously love hummus! It’s the perfect alternative for a healthier snack. I usually eat it with seed crackers or vegetable sticks, like cucumber, carrot or selleri. Super healthy! Yes I do need to eat healthy stuff too, and this is a big craving during my diet periods.
YOU NEED:
1 can cooked chickpeas á 400 g (drain the liquid)
1/2 dl tahini paste
Juice from a half lemon
1/2 dl olive oil
2 cloves garlic
1/2 tsp cumin
1/2 tsp paprika pulver
A pinch of cayenne pepper
1 tsp salt
3-4 tbsp water
Olive oil for garnish
cayenne pepper and parsley for garnish (optional)
DO THIS:
- Place all ingredients in a mixer/food processor. Mix until smooth, at least 1-2 minutes. Add some more water and olive oil if it gets too thick. Check seasoning and add more salt if needed.
- Place the hummus into a bowl. Drizzle the top with olive oil and sprinkle a few dashes of cayenne pepper and some chopped parsley.
- Store in the fridge before serving.
ENJOY YOUR HEALTHY SNACK!! :)
x Jen
INSTAGRAM:
@JENNIFERBERGP & @JENSDELISIOUSLIFE
For all my recipes, visit https://jensdeliciouslife.com/


Unfortunately we don’t eat much cauliflower at home but when we do I usually have it in soup or do a mash with it instead of potatoes if you want to be more healthier.
This cauliflower soup is super yummy and has a taste of coconut and indian spices. It’s also vegan for the ones who desire that. You’ll definitely love this creamy soup.
YOU NEED:
4 port.
1 tbsp coconut oil (or olive oil)
1 yellow onion, diced
1 bay leaf
1 1/4 tsp ground cumin
1 tsp salt
1 tsp ground turmeric
1/2 tsp ground coriander
1/2 tsp ground ginger
1/2 tsp ground black pepper
1/2 tsp red pepper flakes
4 garlic cloves, minced
10 dl water
2 vegetable stock cubes
1 big cauliflower head, roughly chopped to the same size
2 1/2 dl coconut milk in can
1 1/2 tbsp lemon juice
Coconut milk, dry coriander and cayenne pepper for garnish (optional)
DO THIS:
- In a large pot, heat the oil over medium-low. Add onion and all the spices. Fry and stir until the onions become translucent, about 8 minutes.
- Add the garlic and fry another few minutes.
- Then add the cauliflower and mix everything together so it coats with the spices. Pour in water and the cube stocks, bring to a boil over high heat. Reduce to a simmer and allow to cook for about 10 minutes, until the cauliflower is soft.
- Remove the pot from the heat, take away the bay leaf and use a hand blender and mix until smooth.
- Transfer back to the heat and stir in the coconut milk and lemon juice. Taste and season more if needed.
- Serve hot with some nice bread.
ENJOY! :)
x Jen
INSTAGRAM:
@JENNIFERBERGP & @JENSDELISIOUSLIFE
For all my recipes, visit https://jensdeliciouslife.com/
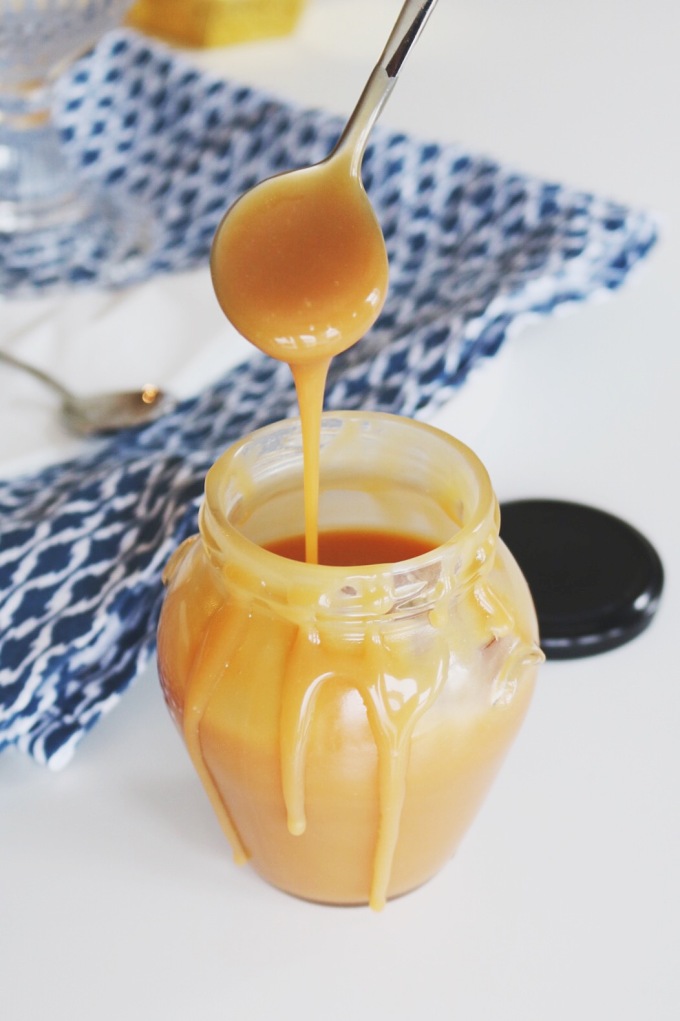


I can’t get enough of this caramel sauce! I have done this sauce a several of times now, and everyone who has tasted it looooves it!! And you will too, trust me. You don’t need a lot of ingredients to do this sauce and you can store it in the fridge in a jar for up to 2 weeks.
YOU NEED:
2.5 dl granulated sugar
1.3 dl water
2.5 dl heavy cream
1 tsp vanilla extract
1 tsp sea salt
1 tbsp butter
DO THIS:
- In a large saucepan over medium heat, add the sugar and water, bring to a boil. Allow the mixture to come to a light brown colour without stirring, takes about 8 minutes. Swirl the pan around to make sure the mixture gets even brown.
- Remove from the heat and gradually pour in the heavy cream, stirring constantly. Stir in the vanilla and salt. Add the butter and stir to melt.
- Pour the caramel into a heat-proof jar and allow to cool completely before using.
- The caramel sauce will thicken as it cools, and when refrigerated.
You will for sure do this delicious sauce many times after you done it once!
ENJOY!!!
x Jen
INSTAGRAM:
@JENNIFERBERGP & @JENSDELISIOUSLIFE
For all my recipes, visit https://jensdeliciouslife.com/


Yesterday we went to our friends cabin and had a wonderful evening with some Easter celebration and a super nice dinner. It’s so nice to get away a bit and just chill with friends. We actually did this last Easter as well so it has become some sort of a tradition. So cozy. We stayed there for one night and are now back home in Reykjavik.
At the moment I’m preparing another dinner at our place with my bf’s sisters coming over. It will just be a chilled Saturday with delicious food. Perfect. :)
x Jen
INSTAGRAM:
@JENNIFERBERGP & @JENSDELISIOUSLIFE
For all my recipes, visit https://jensdeliciouslife.com/


How cute aren’t these Easter cupcakes? And they taste delicious as well. It’s lemon cupcakes with white chocolate frosting, topped with chocolate pieces and mini chocolate eggs to look like a birds nests. So yummy. The perfect treat for Easter!
YOU NEED:
12-16 cupcakes
Cupcakes:
200 g melted butter, cooled
3 dl sugar
3 eggs
1/2 dl milk
zest and lemon juice of 1 lemon (about 1/2 dl juice)
4 ½ dl flour
1 tsp vanilla sugar
1 1/2 tsp baking powder
Frosting:
100g of white chocolate
150g of butter, room temp
150g cream cheese
250g icing sugar
Topping:
Cold dark chocolate (store the chocolate in the fridge before cutting)
Mini chocolate eggs
DO THIS:
- For the cupcakes: Preheat the oven to 220 degrees and set out 12 paper cups in a muffin pan.
- Beat sugar and eggs until light and fluffy. Stir in flour mixed with baking powder and vanilla sugar. Add the melted butter, milk, lemon juice and lemon zest, stir to combine.
- Spoon the batter into the muffin liners and bake in the middle of the oven for about 15-18 minutes.
- Frosting: Melt the chocolate over a water bath or in the microwave and allow to cool slightly. Beat the butter really creamy and add the chocolate and continue whisking.
- Add the icing sugar and the cream cheese and beat until the frosting is fluffy and smooth.
- Place the frosting in a piping bag with a round tip and pipe onto the cupcakes.
- Use a knife and cut along side the chocolate to create chocolate pieces. Sprinkle over the freshly piped frosting and then top with mini chocolate eggs.
- Store in the fridge if not eating within 24 hours. Remove from fridge 30-60 minutes before serving to allow cupcakes to come to room temperature.
HAPPY EASTER! :)
x Jen
INSTAGRAM:
@JENNIFERBERGP & @JENSDELISIOUSLIFE
For all my recipes, visit https://jensdeliciouslife.com/
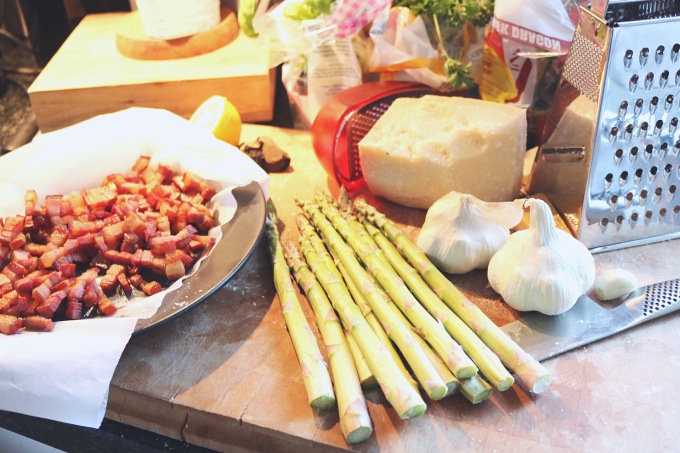
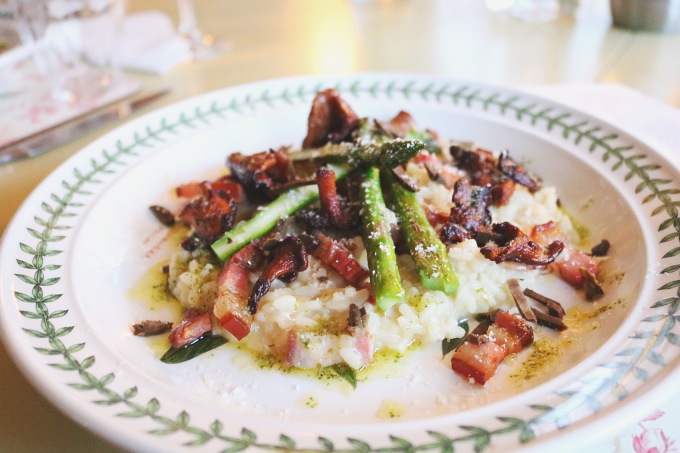
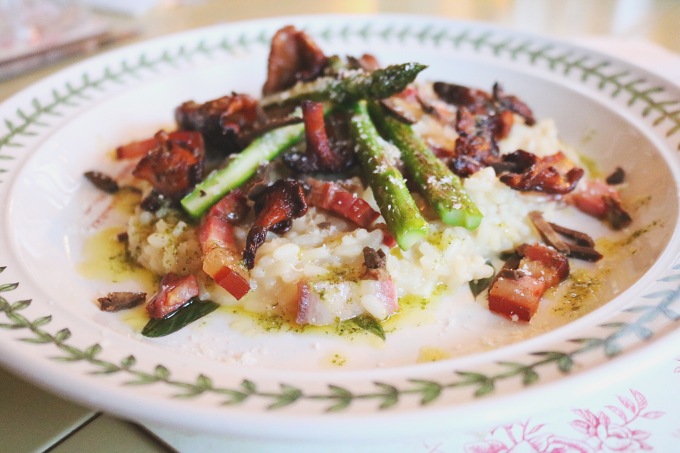
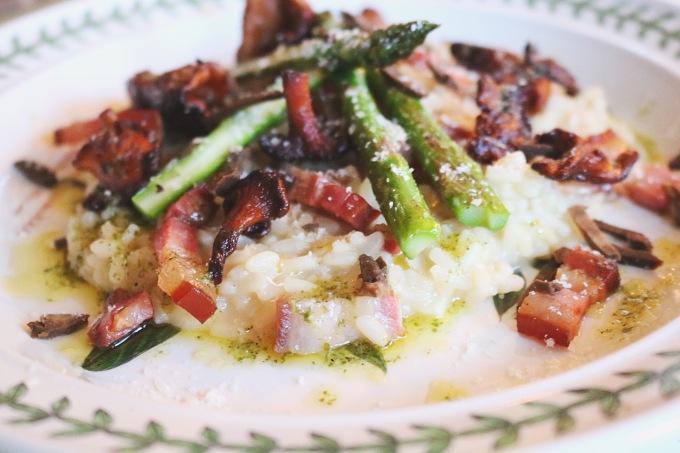
Oh lord, this risotto… So good! All these flavours together is just heaven in the mouth. A simple risotto with smoked pork belly, then just adding fried garnish and drizzle a tasty vinaigrette on top that I made with fresh parsley and garlic. This is something I would serve at my own resturang! A perfect dish to impress your dinner guests with.
YOU NEED:
4 port.
Risotto
3 tbsp olive oil for frying
3 shallots, finely chopped
1 garlic clove, finely chopped
4 dl Arborio rice
2 dl dry white wine
12 dl hot chicken or vegetable broth
2 dl grated parmesan
2 tbsp butter
salt and pepper
250 gram of smoked belly pork, cut into pieces
10 asparagus
100 gram of fresh chanterelle
Butter for frying
Garlic and parsley vinaigrette
1 clove garlic
1 dl olive oil
1 dl chopped fresh parsley
1 tbsp lemon juice
1/2 tsp white vinaigrette
salt and pepper to taste
Grated parmesan as garnish
DO THIS:
- Start with the garlic and parsley vinaigrette. Mix all the ingredients in a mixer and put a side. Fry the pork belly until lightly crispy. Set aside and let drain on kitchen paper.
- Fry the asparagus with some butter, salt and pepper. Cut them in half, lengthwise. Set a side. Fry the chanterelle with a lot of butter and some salt, you can do that meanwhile you’re cooking the risotto. Now you’ve prepared all the garnish. Now cook the risotto, takes about 20 min.
- Heat the broth in a pot. Fry the onions and garlic soft in another pot with olive oil over low heat without getting any color.
- Add the rice, raise the heat and stir so the rice get mixed well with the onion (2-3 min). Be careful not to burn the rice. Pour in the wine and cook until it steamed away. Stir constantly.
- Add the hot broth a little at a time. Start with 3-4 dl, then take 1 dl at a time gradually as the rice absorbs the broth. Stir often and reduce the heat.
- Let the risotto simmer quietly and you need to stir frequently while adding the broth. The risotto should be loose and cooked al dente, then it’s done.
- Remove the pan from the heat, add the butter and parmesan cheese and stir well until it melts then add the pork belly and save some for garnish. Season with salt and pepper and serve immediately.
- Garnish with pork belly, butter fried chanterelle, asparagus, grated parmesan and drizzle over the vinaigrette.
ENJOY!!! :)
x Jen
INSTAGRAM:
@JENNIFERBERGP & @JENSDELISIOUSLIFE
For all my recipes, visit https://jensdeliciouslife.com/


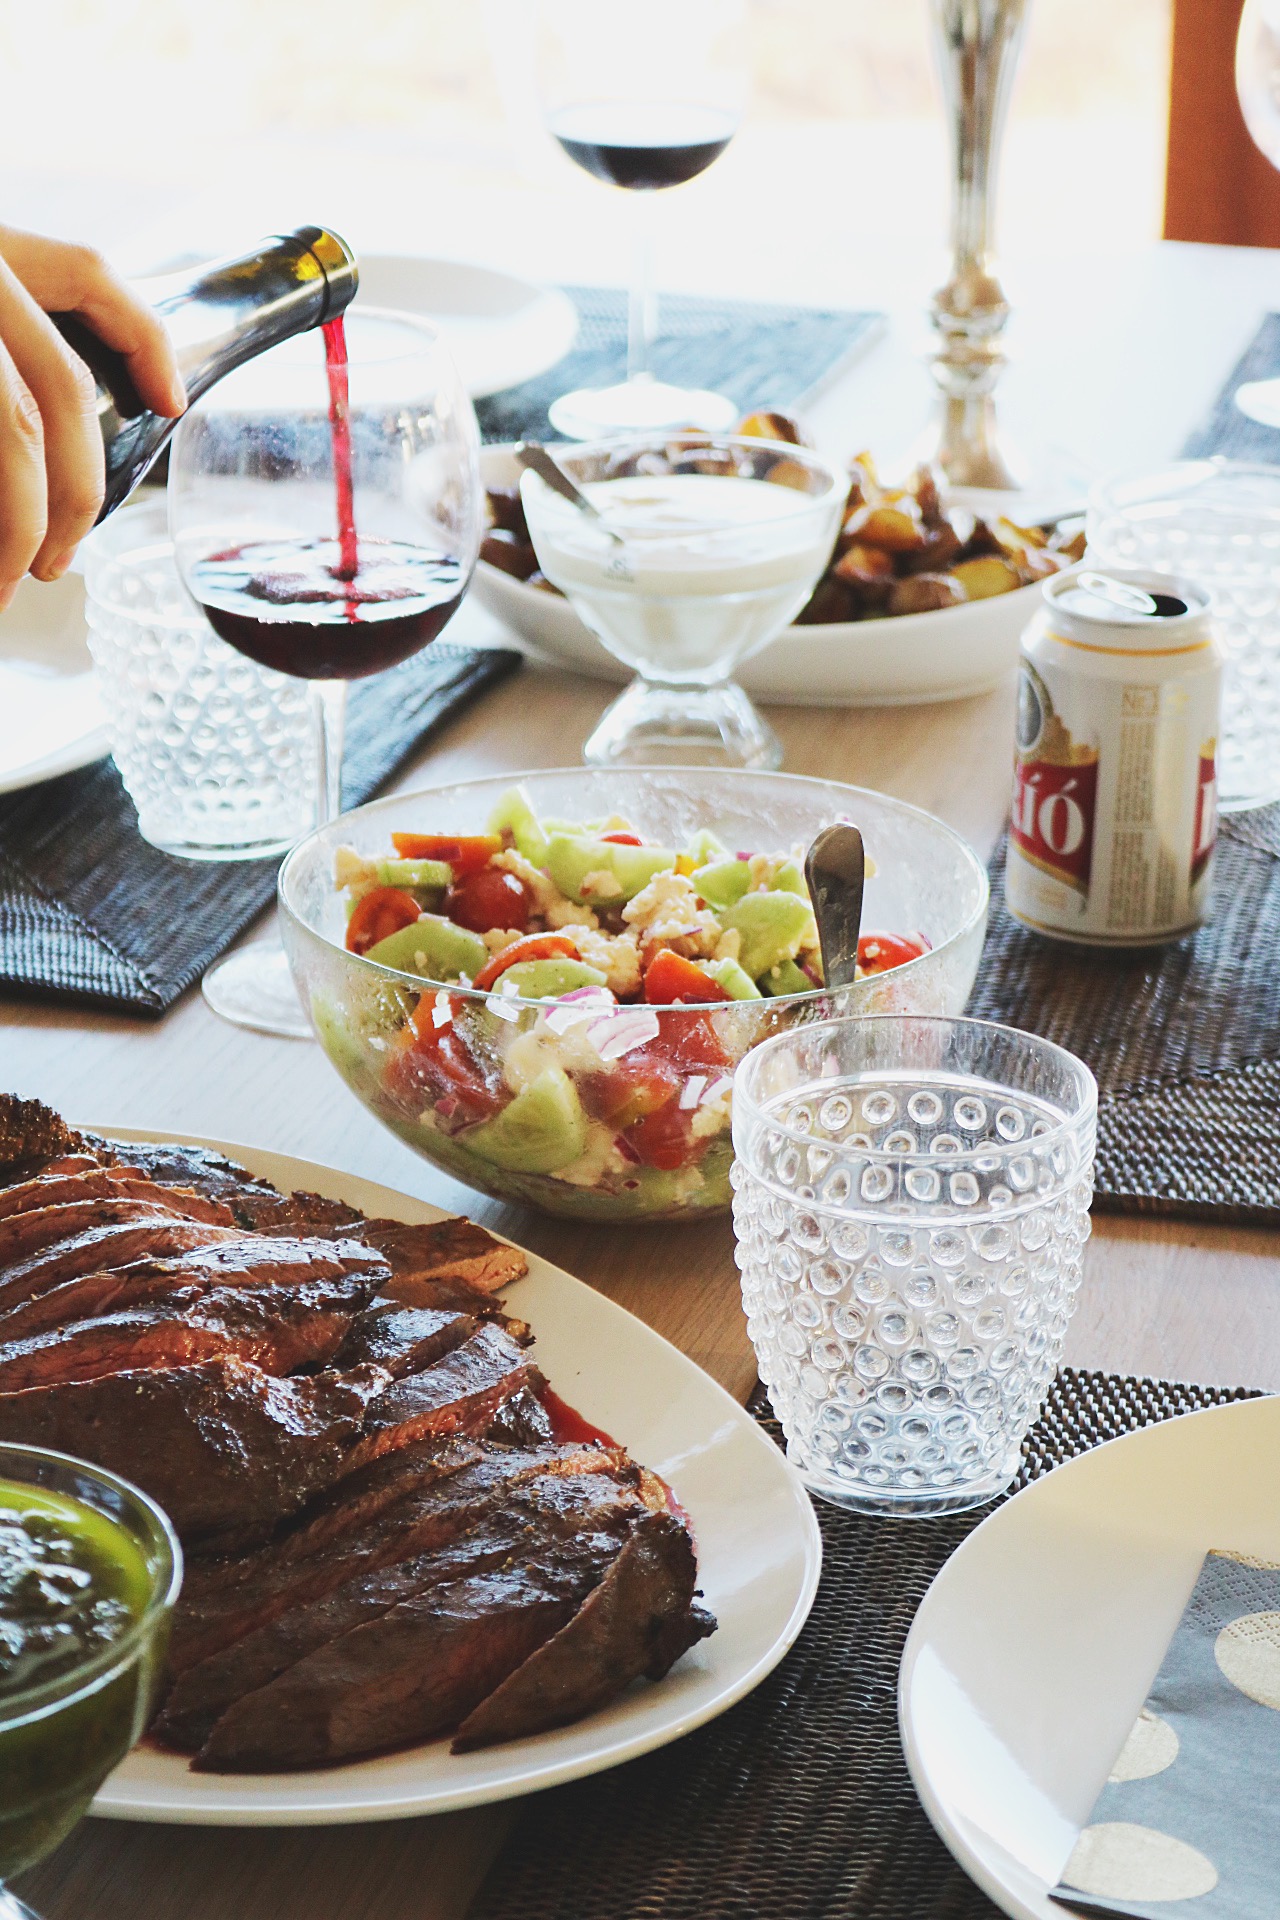
The perfect Saturday meal! I was visiting my family and friends in Sweden for 2 weeks and when I came home I wanted to make a nice Saturday dinner for me and my boyfriend. He had missed my food a lot!
When I usually ask my boyfriend what he wants to have for a nice dinner, he usually wants some good meat. And that is one of my favourites too. A good steak with some nice side dishes is just perfect.
These roasted potatoes are so good. I flavoured them with garlic, parsley and parmesan. Just potatoes can be quite boring sometimes but these Italian flavours got the potatoes to another level. The bearnaise sauce recipe is very easy to make, you can just do the sauce while the meat is resting. It only takes max 10 minutes.
And as many might know about me, I hate to do sallads haha. So boring. No cooking at all, just cutting… But I usually want to have some kind of green on my plate so this time I just fried some haricoverts. Perfect.
YOU NEED:
Good sirloin steak, depends how many you’re cooking for but I would say 200 gram/person.
Salt and pepper
Butter and olive oil for frying
4 crushed garlic cloves
3 fresh thyme sprigs
Italian roasted potatoes:
Potatoes, pic the smallest ones (cut them in half)
Olive oil for frying
Salt and pepper
3 garlic cloves, minced
1 dl chopped fresh parsley
Grated parmesan
Bearnaise sauce:
150 g melted butter
3 egg yolks
2 tbsp white wine vinegar
1 tbsp grated onion
1 pinch salt
½ tsp white pepper
2 tbsp chopped parsley Fresh
1½ tbsp chopped fresh dragon
Haricoverts and olive oil
DO THIS:
- The Meat: Preheat the oven to 100 degrees C. Dry the meat with some kitchen paper. Salt and pepper the meat all around. Heat a skillet with olive oil and a lot of butter. Add the crushed garlic and the thyme sprigs. Fry the steak until it gets a nice colour all around and pour the melted butter on the steak during the time. Transfer the meat to a ovenproof dish. Put in a meat thermometer and cook in the oven until it reaches 58 degrees C for medium rare. Pack the meat in aluminum foil and let rest for 10 minutes before cutting to pieces.
- The potatoes: Preheat the oven to 225 degrees C. Heat up an oven-safe skillet and add the olive oil. Add the potatoes and cook until the surface turns crispy. Lower the heat and fry the potatoes until they are almost done. Add the garlic, stir to combine well. Add some butter, turn off the heat and sprinkle with parsley and top with grated parmesan. Transfer the skillet into the oven, roast for 10 minutes.
- Bearnaise sauce: Pour the egg yolks and vinegar in a high mixing bowl. Melt the butter. Pour the hot butter in a thin stream into the bowl during mixing. Don’t include the white mass that usually is in the bottom. Season with onion, salt, pepper, parsley and tarragon.
- Fry the haricoverts quick with some olive oil.
Serve with a good glas of red wine! :)
ENJOY!
x Jen
INSTAGRAM:
@JENNIFERBERGP & @JENSDELISIOUSLIFE
For all my recipes, visit https://jensdeliciouslife.com/